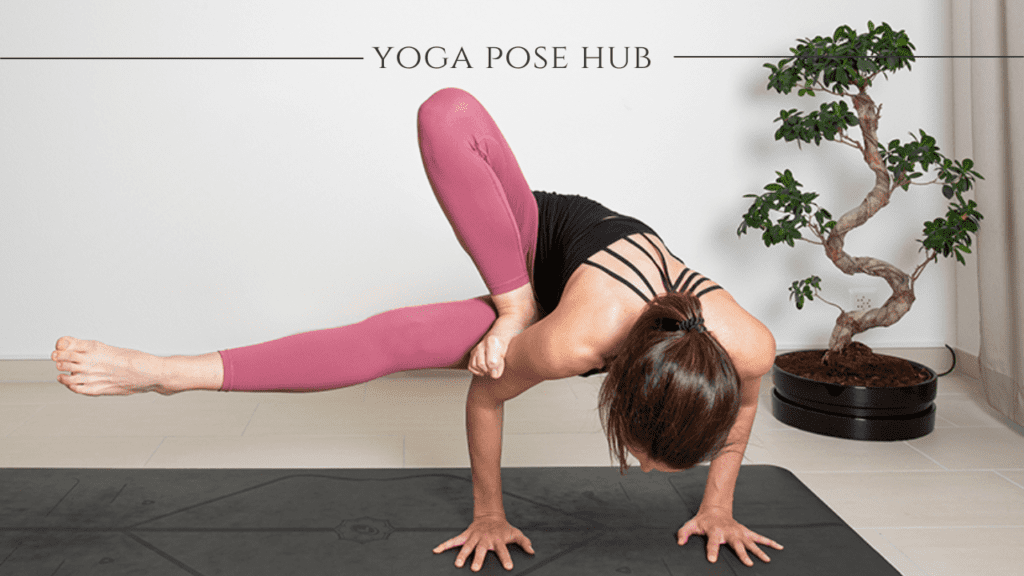
Ever wondered what it feels like to be as agile as a grasshopper? In yoga, there’s a pose that lets you channel that same energy—the Grasshopper pose (Maksikanagasana). Not only does this pose look impressive, but it also offers a host of benefits, from strengthening your core to enhancing your balance. It’s a challenging pose, but with the right approach, you can master it. Let’s explore how you can progressively work towards nailing this advanced yoga asana.

What is the Grasshopper Yoga Pose?
The Grasshopper pose, also known in some circles as the Dragonfly pose, is a complex arm balance intertwined with a deep twist and lateral extension of the legs. It’s known for its ability to challenge and improve multitasking skills within your body as it requires strength, flexibility, and poise—all at once. While it might seem intimidating at first, breaking it down into manageable steps makes it accessible over time.
Preparing for the Pose
Effective Warm-Up Strategies
A proper warm-up is critical before attempting the Grasshopper pose. Start with gentle joint rotations and dynamic stretches to awaken the muscles. Include yoga flows such as sun salutations to raise your body temperature and increase blood flow. Hip openers and shoulder stretches are particularly useful to prepare your body for the demands of this pose.
Necessary Equipment
A good-quality, grippy yoga mat is essential for safety and performance in this pose. Wearing appropriate yoga attire that allows for unrestricted movement will help you execute the pose more effectively without discomfort.
Step-by-Step to Master the Grasshopper Pose
Step 1: Foundation in a Squat
Initiate the pose from a low squat, which helps ground and stabilize your base before you start the twist. This squat also begins the engagement of your core and lower body muscles.
Step 2: Execute a Deep Twist
From your squat, twist your torso to the right, hooking your left elbow around your right thigh. This twisting action starts to activate the obliques and warms up the spine for a deeper extension.
Step 3: Hand Placement and Setup
Carefully place your hands flat on the mat, shoulder-width apart. This is where your grip and the quality of your yoga mat come into play, ensuring your hands don’t slip and providing a firm foundation for the pose.
Step 4: Transitioning Into Balance
Shift your weight forward onto your arms, bending them slightly like springs. This transition is crucial and requires you to engage your entire core to support the shift in balance.
Step 5: Extending and Balancing the Legs
Gradually lift your feet off the ground, extending your left leg out to the side. This requires both muscular control and spatial awareness to maintain the pose without tipping over.
Step 6: Stabilize and Hold
Once in position, focus on stabilizing your posture. The extended leg should be active and the standing leg’s foot flexed to aid in balance. Breathing steadily helps maintain the pose without straining.
Curious about more yoga poses? Check out our detailed guide on “Crescent Moon Yoga Pose” for another enriching addition to your practice!
Curious about more yoga poses? Check out our detailed guide on “Crescent Moon Yoga Pose” for another enriching addition to your practice!
Benefits Grasshopper Pose
Practicing the Grasshopper pose offers an array of physical and mental benefits:
- Strengthens Core Muscles: This pose requires a strong core to maintain balance, helping to build abdominal and lower back strength.
- Increases Flexibility: Regular practice stretches and opens up the hips, torso, and shoulders, promoting flexibility in these typically tight areas.
- Enhances Balance and Focus: Achieving and maintaining this pose requires a sharp focus, which can translate into improved concentration in daily activities.
- Promotes Mental Fortitude: The complexity of the pose teaches patience, perseverance, and resilience as you work towards mastering it.
Avoiding Common Mistakes
Rushing the Pose
Take each step slowly and deliberately. Rushing through the steps can lead to improper form, reduced effectiveness, and even injury.
Neglecting Warm-Up
Skipping a thorough warm-up can lead to stiff muscles, which increases the risk of strains, especially in such a complex pose.
Incorrect Hand Placement
Ensure your hands are properly aligned and pressing evenly into the mat. Uneven weight distribution can lead to imbalance and undue stress on the wrists.
Modifications for Beginners
If the full expression of the pose is too challenging, you can modify it by keeping the toes of your bent leg on the floor to stabilize and gradually working up to lifting both feet as you build strength and confidence.
Curious about more yoga poses? Check out our detailed guide on “Gate Pose Yoga” for another enriching addition to your practice!
Advanced Tips for Seasoned Practitioners
Experienced yogis can challenge themselves further by extending both legs fully, increasing the physical demand and intensity of the pose for greater strength and flexibility benefits.
Cooling Down After the Pose
After practicing the Grasshopper pose, engage in a cooling down sequence that includes poses like Child’s Pose and Seated Forward Bend to relax the muscles and return your heart rate to normal.
Safety Measures for a Healthy Practice
Always practice within your limits and listen to your body’s signals. If a pose feels painful or unsustainable, back off and consult with a yoga professional for guidance on adjustments or alternative poses.
Conclusion
- Consistency Pays Off: Regular practice and patience are key to progress in yoga.
- Celebrate Small Wins: Every attempt brings you closer to mastering the pose.
- Enjoy the Journey: Embrace the challenges and joys of your yoga practice.
The Grasshopper pose is not just about physical prowess—it’s about the journey towards achieving something that once seemed impossible. Are you ready to take the leap and embrace the challenge? How will you incorporate this exciting pose into your routine? Let’s jump into this adventure with enthusiasm and determination!